Saturday 19 November 2011

Mom's Tiger Pendant

Last post I gave a sneak peek at the pendant I made out of FIMO for my Mom's birthday.
First of all the idea -One of my favourite paintings by my Mom (well, it was mixed media) was the Tiger abstract she did as part of a distance art course back when I was little:

Then I got busy with the FIMO...
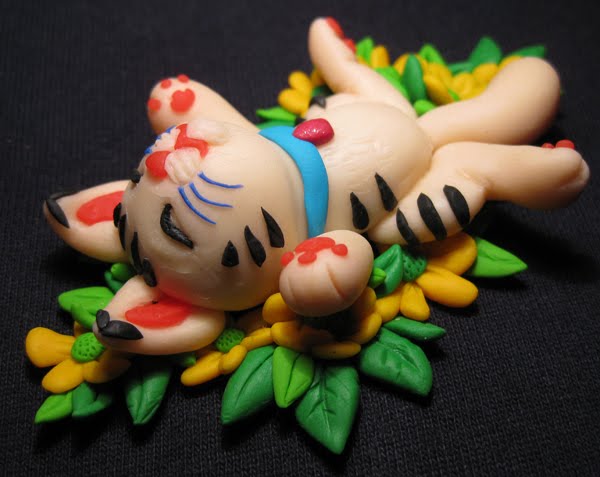
I always work on the baking sheet, ready for putting everything in the oven. Light colours first, then working towards darker ones, being careful to clean the furrows in my fingertips whenever I change a colour, so as not to muddle the next one I use. I indented the white a bit to have a rough idea where what colour was supposed to go. I also use a small knife and a toothpick plus my nails to work the small parts and move and push them into place.

By the way, the creamy colour is flourescent ;]

There were some bits I just had to simplify... :}

Then comes my favourite part of any drawing, painting or creation -adding black. It makes colours pop and rounds off an image splendidly.

And last but not least, the finished pendant all strung up, ready to be sent off.


Oh yeah, if you like her work, check out my Mom's Redbubble site.

Edit: My Mom's painting has taken flight and was part of the 2013 Nato Tiger Meet in Norway as artwork on a Gripen fighter jet. Photos here and here.

Monday 31 October 2011

Happy Halloween

Can't have Hallowe'en without some jack-o-lanterns... These babies
were carved a bit late, but for my first try, I'm pretty happy with
them... Next year I promise to be a bit better organised. ;]

Monday 8 August 2011

A Sneak Peek...

;}

Monday 1 August 2011

In the meantime...

...I was actually industrious enough to finish off this sketch for Ingmar. I've been wanting to make him a new desktop image for a good year ...or two, and now it's there and looks pretty swish with his Ubuntu, which has transparency settings on some of the windows, meaning this picture shines through a sea of code. :}

Saturday 23 July 2011

Earring Holder

Hi folks,
there are plenty of ideas for earring hangers floating around the internet, and I won't take any credit for the idea, but a friend asked me if I would share how I made mine.

My original inspiration was this great blog, H is for Handmade, but I figured I could do it a step simpler (since I neither have lots of lace nor a sewing machine) so I just took one piece of material. However, Amy's version is better suited to all kinds of earrings as well as hair clips.
I bought a small frame (about 20 x 20 x 5cm) from a local art shop and found the wooden decorative cutouts there too.

I then tacked the material into the inner sides of the frame (so you probably need something sturdy), working from opposite sides to avoid wrinkles. I also took a 2x2cm cube as a backing for the cutouts so they aren't directly on the wall. It makes the whole thing stand out more. Just glued everything together and voila, hang away. I think it was done in ten minutes.

Thursday 24 March 2011

Cheshire Cat Earrings

A friend of mine likes the Cheshire Cat from Alice in Wonderland, so decided to make her a set of earrings out of FIMO.

The full fleshed version is unfortunately a bit heavy, but she wears the skeleton variation often. My inspiration was in fact the skeleton of a baby mouse I once found. It's about the same size (roughly 5-6cm long, 2cm wide) However, being that it should be the cheshire cat, it's got a wicked set of teeth to boot. :D


It wouldn't be the cheshire cat without the 'night-light effect'...

Sunday 13 March 2011

Kitty

I could make birthday presents all year round (if only I didn't need to work to finance the materials :]).

This little kitty took me about three hours to complete. He's about 8cm from top to tail and is made of FIMO.

Starting out...

Flourescent FIMO takes a lot of kneading to be pliable without crumbling...

Almost done...

After some detail work and baking, the pads, nose and ears become translucent.

Night Mode!